This tutorial was written by me, any resemblance to any other tutorial is completely unintentional. PSP version used: PSP X2
Supplies:
Tube- I'm using an awesome artwork tube of Elias Chatzoudis, you can purchase those at PSP Tubes Emporium, You must have a proper license to use his artwork. Template 8 from Amy and Leah's Halloween Templates, you can download that HERE. Scrap Kit of choice- I used Spook which is a FTU kit from Melissa's Inspirational Scraps, which I CT for! You can find that HERE.
Font- Wizards Magic
Filters:
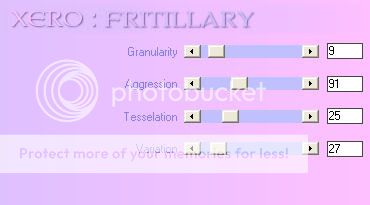
Xero> Fritillary
Xero> Radiance
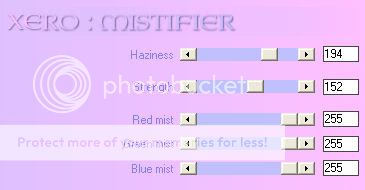
Xero> Mistifier
dsb flux> Bright Noise
Let's get it started! :)
Open your template, and then resize to 650 x 650. Select sm circle, and copy and paste your tube.
Paper1, select magic wand, and select circle again, Selections>Invert, delete.
Paper8, behind large circle, magic wand the circle. select paper, Selections> Invert, delete.
make lg circle invisible.
On the paper circle do Xero> Fritillary:
Paper4, resize 70%
Magic wand s 4, and click on paper layer, Selections> Invert, delete.
Paper13 do same steps as above for s1, s2, s3.
Gradient two colors from your color palette, bucket fill on lg circle back, and sm circle back. I did purple and orange.
dsb flux> bright noise
Paper4, resize 70%, copy and paste. Magic wand- s 4, select paper, Selections>invert, delete.
Paper14, do the same steps above on layers s1, s2, s3.
Gradient 2 colors from your palette, and bucket fill both circle back layers.
dsb flux> Bright Noise, Mix 75. on both.
Increase repeats in gradient, and bucket fill rect.
dsb flux> Bright Noise on rect back
Decrease the gradient repeats and bucket fill lg square back, dsb flux> Bright Noise
Pick 3 colors from the palette and bucket fill them into the top and bottom strips.
Now for your close up tube. Copy and paste, resize if needed, and position over circle. select sm circle again with magic wand, Select tube, Selections> Invert, delete.
Xero> Radiance- 128, 50, 128, 124.
Still on the close up, Xero> Mistifier with these settings:
Softlight, Opacity 60
Now, duplicate your full tube layer, mirror, position over the 3 squares the way you want them. Cut out parts of the tube you want to show in the squares, as I said from above. :)
Merge 3 squares with matching layers to make one layer. Effects> Texture effects- Blinds 2, 40.
Opacity- 80
Now for the elements! Woo hoo!
Spooky house- 30%
Web- 100%
SpideronWeb- 30%
Broom- 100%
Cauldron- 45%
Gravestone- 30%
Now, I used Wizards Magic font, at 65 for the awesome Shayuri at 70. :)
Lokas Software> Gel, default settings, to both font and template WA.
Drop shadow on everything, and add your copyright and water mark!
POOF!!! You're done!!!
Hope you enjoyed my tut and please leave me some love to let me know you stopped by! :P